Showing posts with label craftster. Show all posts

Monday, October 3, 2011

Cute Kratos

Greetings all,
this one will be a quickie. here's a project i put together a while ago, but haven't gotten around to posting until now. my husband had given me the book creepy cute crochet ( http://www.amazon.com/Creepy-Cute-Crochet-Christen-Haden/dp/1594742324/ref=sr_1_1?ie=UTF8&qid=1317675588&sr=8-1 ) a while before and i thought he needed a cute kratos. if you aren't familiar with the character, kratos is the star (an anti- hero if you will) of the video game series god of war (we are both pretty big fans).
for those not familiar, here's what he looks like:


....and here's my cute version (yes, he's sitting on pandora's box from the "ultimate edition" of god of war III ... i told you we were fans ;)


i used the basic head, body and arms from the book and designed everything else myself. he's crocheted out of a light grey yarn (vanna's choice) his implements are all made of felt except for the "chain" on his belt and around his wrists which is embroidery floss. his eyes are black plastic doll eyes


note the stitched on abs here ;)


and a final pic of him with his not-so-cute alter ego


thanks for looking!

i'll be back next week with more killinger escipades ;)

-sarah

Wednesday, April 6, 2011

just a tidbit

i just wanted to share with y'all the lovely little write up geekysweetheart of geekcrafts.com did on my weeping angel barbie (and while you're at it, please check out the rest of the site. so many geeky crafts, so little time!):

http://geekcrafts.com/weeping-angel-statue-with-tutorial/

i'm wondering if, as i type this, there are hordes of angels being created....... **shudders** ...WHAT HAVE I DONE??? :D

Thursday, March 31, 2011

Don't Blink!


*****UPDATE 3/27/2014: after much soul searching, repeated requests, and another glimpse into copyright law I'VE DECIDED TO MAKE THESE TO ORDER!  while i still highly recommend that you make them yourself using my tutorial, this is a way to support the work, and for the crafting (and time) challenged to have their own weeping angel inspired piece!

the link to my etsy listing is HERE!


greetings readers,
i admit it. i'm a geek. and a proud one at that. i'm also a longtime doctor who fan. i grew up watching the 4th doctor (tom baker) and was never very satisfied with the ones that came after, until the series was revamped in 2005. i've successfully indoctrinated my husband into the whoniverse (we are also huge torchwood fans) and decided to decorate our bathroom with the scariest themes of the whoniverse. the bathroom is a work in progress, but i'll get to posting more about it later, i promise. it occurred to me that one of the most obvious monsters for me to make in particular was a weeping angel barbie. for those not in the know, weeping angels are creatures that appear to be statues of angels with their hands over their eyes (hence the name), but whenever someone (or something) is not looking at them they can move-fast. even blinking can allow them to get you. so here's the "why," now i'll show you the "how."

i cut a wing shape out of craft foam and added details with hot glue.


i discovered that even jointed armed barbies' arms are not in a proper position to cover their eyes so i had to cut and reattach the arms at the elbow. more hot glue.... a high temp gun makes all the difference here. her arms aren't going anywhere.


i also took the time to glue all of her joints so they are solid and attach her to a base- yes, with wooden skewers.


i realize that i'm missing a picture here, but i attached the wings next using high temp hot glue again.

a simple gauze dress was added. the gauze allows for the proper folding and drape (once paint and glue are added) to be indicative of the romanesque statues the weeping angels disguise themselves as. also in the picture below you can see peeking out from behind one of her wings my rendition of the bottle of tears from the torchwood episode "from out of the rain"


then came the problem of her hair. despite barbie's fashion sense, styling her hair any more than ponytail or down is next to impossible. in order to create the carved waves seen in statuary i needed to rely on my trusty glue gun again.


i next used craft glue to settle her dress more, and prepare the piece for priming.


and somehow i didn't get a pic of the piece primed, but just imagine the entire piece white ;)  the primer i used is a regular brush on house paint primer (like Kills) you could use a spray one i suppose, but i liked how i could really saturate the dress and make it a solid piece this way.

instead of trying to fake the stone texture myself i decided to use a textured spraypaint. i am quite pleased with the results!  i used a "sand" texture instead of the "stone" texture as the flake was much more to scale for the size of the doll.


and here she is in her proper place. i am quite pleased with how well she fits with the small shelf i had lying around. ....and do not worry for me who fans, i am placing a mirror directly opposite her so she will be trapped ;)


thanks for looking!
-sarah

Thursday, February 17, 2011

MOOSE!


greetings all,

i wanted to share with you a project i finished recently that was so much fun to make! i was commissioned to make a moose costume for a local event. the only guidelines were "the goofier the better" and it was requested that he have chest hair ;)

well, i tell you, i was super excited, but i had *no idea* where to start for the head portion. i have lots of experience under my belt both in costuming and plush creatures, but i'd never made a mascot type head before..... so i went to the internet! i found the most *amazing* site by an incredibly talented young woman that totally saved my day. she has a bazillion detailed tutorials and her pieces are just spectacular. check her out at www.matrices.net despite fabulous tutorials this was still a learning process for me so there was still some trial and error. sure, there's stuff i would do differently next time, but all in all i'm pretty proud of the results.

apologies for the "messy studio" pics.... this is how i work ;)


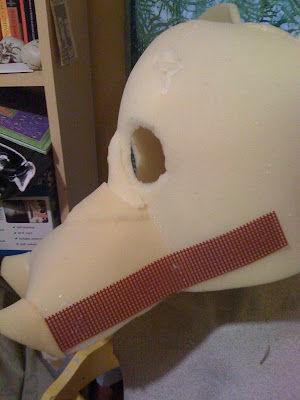
here he is in his first phase.... so far he's made up of 1/2" foam and hot glue (i used *so much* hot glue on this project.... you would not believe!) the red strip on his cheek is plastic canvas, used to stabilize the piece yet still be flexible.


next were the antlers. i cut the shape out of more plastic canvas and covered one side with 1/2" foam. then on the canvas side i glued wooden skewers, cut to size, and added more canvas to stabilize the middle, then i covered this side with 1/4" foam.

here he is with more canvas to carry the weight of the antlers as well as to make them easier to attach.
antlers attached, and more foam added to give his face more dimension and personality. i love these pics on my mannequin, Stone, they are just so absurd!


i'm nearly finished foaming here.... he just needed a sneer...


yep. there he is. ;)


now onto "furring." instead of faux fur i used a stretch panne velvet as i was never satisfied with the furs available. the teeth and gums you see here are made from more foam. the colored craft foam kind this time.


and here is where i started covering the antlers. they are covered in flannel.


and now he has ears and nostrils, both covered in felt.


and at this point i decided he needed a bottom jaw as i decided he needed a tongue... (part of what i mean when i said i'd do some things differently next time)


mouth lined with more felt and he has eyes now.... these are made from plastic bowls... yes you read that right! this is the part i would really change next time. i didn't use the proper bowls as i was in a time crunch and after running a few places i got the best i could find at the time. i wish i'd found something bigger so i could have a smoother curve instead of the ridge he has, but you live and you learn.


here's his tail. it's designed to be threaded through a belt in the back (that's what my hand is going through)


and this is my third and final attempt at a moose hand.... sometimes i just don't understand why some parts are so hard. this was supposed to be the easy bit, but i was over complicating it. they ended up being just simple gloves out of the stretchy panne and felt. for some reaason i didn't get a final finished picture, but the only difference was that i hand sewed the felt onto the panne at the overlap, making them more like one piece, subtle, but effective i think.


and two shots of my "helpers".... one looking sooooo comfy i didn't have the heart to move her, the other exuding his macho nature by using a pincushion as a pillow! weirdos! (and don't worry, the glue gun was cold ;)

i realize now that i didn't get a pic of the dickie i made to put under the lumberjack shirt.... it was really simple, made mostly of the panne, accentuated with a black faux fur i found for chest hair.

here he is in all his glory:


thanks for reading, and have a wonderful day!
-sarah

Wednesday, December 15, 2010

Huldra

greetings readers! i am so excited to finally be able to post about this next piece. it was commissioned as a gift some months ago and has been gifted so i can post her!


What is a Huldra? Huldre are Scandinavian fair-folk, usually described as beautiful women until their cow's tails are revealed.... this little lady is obviously embracing much more of her cow's nature and isn't afraid of being found out. she's amongst friends here.
more information about huldre can be found here: http://en.wikipedia.org/wiki/Huldra

that infamous tail:


her hooves.


i chose her hair color and style because i fell in love with the look highland cattle have: http://www.birchimages.co.uk/galleryimages/Highland%20cattle%20Scotland%202.JPG


this huldra is still connected to her roots and is wearing a bronze-age style string skirt as seen here: http://en.wikipedia.org/wiki/Egtved_Girl


so, what's with the two sticks? this was a commissioned gift for a very special and very talented woman i am honored to know. she is a volva (staff-carrier) and uses her stav (staff) to create music... more info here: http://karitauring.com/about.html


i got to use my new rotary tool to craft the stav and tine from sticks given by the maple tree in my backyard. i'm absolutely in love with the tools now and have no idea how i existed without it before!


and here she is, ready to dance and play!


thank you so much for looking!