Showing posts with label geek. Show all posts

Thursday, March 8, 2012

who loo


it all started with a dalek.  

some years ago i crocheted a dalek and then decided it needed to be a toilet paper holder....  i got the pattern from this lovely site PDF here 

here you can see the inside where i reinforced it with plastic canvas and felt.

we used it for a while, but it seemed so out of place in our otherwise normal and fairly organic bathroom.  it was done in greens and browns, with a matchstick window shade and twiggy baskets and a leafy print shower curtain complete with leaf hooks.  the poor dalek looked so incongruous there.  when it came time to renovate the room i knew what my inspiration piece would be for the new decor. 
we did a lot of work in this room before the decorating as there were lots of repairs to do.  we put in a new subfloor, new linoleum, new shower surround, new sink, new cabinets,new mirror, new toilet roll holder, new towel holders..... about the only things we kept to the original were the tub, the toilet and the window.  you see, due to some old water damage, we had to take down the tile.  all of the tile.  the room was tiled on all four walls up about 4 feet in a sickly pinkish beige that i never, ever could stomach.  these tiles also included built in towel racks and TP roll holder.
because the walls were so damaged from removing the tile we opted for wainscoting instead of paint. and yes there were many references to this monty python sketch   when we put it up.

here you can see the cool tub detail.  our house was built in 1947 and the tub is original.  i liked these lines a lot and tried to echo them in the fixtures we found.  also, note the blood red chenille rugs.  when thinking about remodeling my husband and i were playing bio shock 2, a game with a vintage sci fi look.  i used a color scheme that felt this way to me, it also goes with the older house as well as the whoniverse.


i picked this light fixture because it reminded me of a vintage rocket ship.


 and for the last bit of boring non-whoniverse related stuff, the sink.  just a little pedestal we found with some similar lines.  of course i needed the classic retro porcelain taps.


and now onto the fun stuff!
this is the cutting of her grandfather that Jabe Ceth Ceth Jafe from the forest of cheem gifts to the doctor and rose in the dr. who episode  the end of the world.  pictured in the lower left hand corner of this still.  i made this from a twig i cut and re glued together, some faux leaves, and a peat pot that i sealed with mod podge to protect it from moisture. 


i couldn't find a whoniverse themed shower curtain.... and while searching i fell in love with this little beauty from thinkgeek.com.


i realized then that in order to be consistent i needed to pull from the scariest parts of the whoniverse, especially including pieces from dr. who's darker, deadlier, more grown up cousin, torchwood.

which brings me to this.
the  bottle from the torchwood episode from out of the rain. i still really need to track down an old film canister to place behind this to complete the effect.  i couldn't find the proper shaped container and am not quite happy with the finished product so i may actually redo this at some point.   this was a glass vinegar bottle i painted.  the raised detail is polymer clay painted the same as the bottle. in real life this actually looks much more metallic.  i used a metallic paint after all.  also at some point i need to get my hands on an old metal film canister to place behind it.


 a gas mask from the doctor who episodes the empty child and the doctor dances.  no i didn't make this.  it's something we've had in our costume bin for years.  my husband picked it up at a military surplus store when he was still in high school.  in digging it out of storage for use here i realized, not for the first time, that we probably aren't your average couple.  it's not many times when you can hear yourself calling, in a cheerful voice, "hon, have you seen the gas mask?"

 the weeping angel, originally from the doctor who episode blink that i posted about here

and here's how i've 'trapped' her with mirrors....


in that last photo you can see the TARDIS quilt covering the window.  here it is during the day.  the windows only have one layer of fabric and no batting so the sun comes through  just like the lights in the 'real' TARDIS. 


some detail shots here.  i used cording to outline the recesses in the wood and bias tape for the separation line between the doors.  also, to add more dimensionality, i omitted the batting in the recessed rectangles, although it's hard to see here.


quilting details added to mimic wood grain.


the lettering is just some iron ons i found at the craft store.


and this is all i have so far.  i have a couple more project ideas in the wings, like jack's wrist strap and possibly something really creepy... my husband half-jokingly suggested a face of bo toilet seat cover.  there's something so wrong and so right about that idea i just might have to do it.  if and when that happens you bet i'll post about it!

as always, thank you so much for looking!  hope you have a great day,
-sarah


Monday, January 23, 2012

craftster best of 2011

HOLY CRAP.... i should perhaps be concerned that these creepy little things will take over the world now, but i'm just really honored to be on this list.... check out the awesomeness that is the Craftster Best of 2011!

Craftster Best of 2011 Winner
I'm a Craftster Best of 2011 Winner!

Monday, October 31, 2011

building Dr. Killinger part 4: the finale... putting him all together

greetings!  i'm sorry i didn't get to posting this last week.... i wanted to show the final costume all put together and we just didn't get pics taken until saturday.  the bonus is that you will get two posts this week!
let's see, we have a mask, a murder bag, gloves and shoes....  just how many props does one costume need?  a lot apparently ;)  dr. killinger *is* a doctor after all so he needs a stethoscope.


i picked this up at a local surplus store. it's an actual working stethoscope!  but it was black.  i painted the tubing with silver fabric paint.  fabric paint so it will remain flexible and not chip off.... works like a dream!

next came the handcuffs (he keeps his magic murder bag handcuffed to his wrist.... one can't let those wondrous secrets get out ;)


these were just cheap metal costume cuffs i found.  even though they were already silver colored i felt i needed to help them fit in with the other painted items so i added a touch of the fabric paint


next up, the umbrella....  because no evil mary poppins figure is complete without one!


i started with this.  it was the closest i could find.... black fabric with a crooked handle, but it still needed some painting.

i added red fabric paint to the outlines of the umbrella....  following the contours like the illustration lines in the cartoon.


i also painted the handle and shaft.... and coated this in hard coat mod podge to protect it. (have i mentioned lately how much i love that stuff??)


the red edges make for a really cool effect when the umbrella is closed

next up, the coat!
he's really wearing a black 3/4 sleeve chef's coat.  you can find them made for women, but i wanted to save some $$ and make it myself, but i couldn't find a chef's coat pattern in a women's cut and since i already was spending a lot of time and work on this i didn't want to have to drape a coat so i decided to modify a pattern...  this is the closest thing i could find:

it worked really well.  there were several options built into the pattern.  once i figured out which version i would make i still needed to mod it a bit.  my modifications were to add 3 inches to the with of the front panels (so the buttons were farther apart), use only the collar base to make the mandarin collar, lost the belt and belt loops, and take a smaller seam allowance for the with of the coat so it was a little more roomy without being too shapeless (the sleeves and shoulder seams stayed the same)


again, to up the cartooniness i followed the contour lines of the coat with some silvery grey bias tape (i couldn't find piping in the right shade ;)

the buttons were the cover your own kind that i just glued together and painted with the metallic fabric paint for that slightly unreal look.  you can also see how i got out of making buttonholes for this.....  i despise sewing buttonholes, but love buttons!


here you can see the effect of the buttons, 'piping' and stethoscope together.....


i cut the killinger logo out of some red faux leather i had and sewed it on the coat (the same stuff i painted and used on the murder bag)


and the coat is lined in red satin ;)

and one might wonder what i wore under the coat?

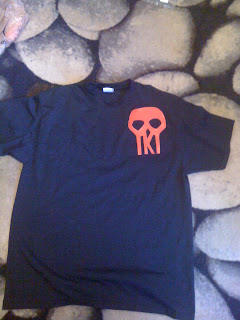
just a black t-shirt with the same logo process as the jacket because i knew i'd get warm if i was inside with a lot of people.  this worked out quite nicely.


 also, on my legs were just a pair of black leggings i gave the same treatment as the gloves (red fabric paint contour lines)
and here he is in all his glory: 


 one note.  i wore this for two parties...  the first one i just powdered my hair.  it looked really great except it was really messy...  i had powder everywhere!  not the greatest choice when you're costume is black :/  we took these photos on the next day before the second party... i found some spray color, but it really didn't work well at all......  i may just invest in a grey wig :(


 thanks so much for looking!   i'll be back later this week with Dr. Rusty Venture!
have a safe and happy halloween!
-sarah


Tuesday, October 18, 2011

building Dr. Killinger part 3: magic murder bag and sundry

greetings! i'm back with another edition of "building dr. killinger.

this time around i'm focusing on the magic murder bag.
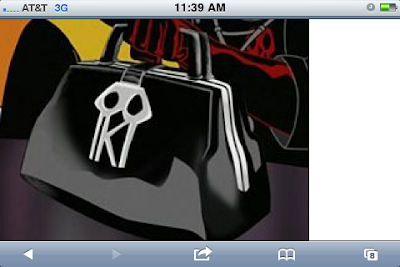
here it is in the cartoon:


but first of all i wanted to show you the finished mask. to cover the eye sockets and still be able to see (in the cartoon they are a soft yellow... like they glow) i used a very sheer white fabric from my stash that i colored with a yellow marker (because if i used paint it would clog the holes and reduce visibility and dye won't really take on this polyester- besides, it's such a small piece why dye?)


and here is the final mask after varnishing and gluing the fabric in the eye sockets..


and here's an action shot.... i didn't realize just how creepy it would turn out after i covered the eyeholes.... it looks like i don't have eyes!


ok, as promised the magic murder bag.... this one didn't require much after i tracked down the right bag. that took some doing as i wasn't about to pay for a *real* vintage leather doctor bag especially since i'd have to paint it :/ so i found this amazing vintage bag on etsy for under $30 including shipping!


as you can see there's not a whole lot i'd have to do...


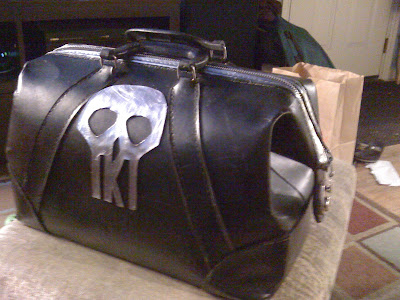
here is the final bag. i blackened the stitching, painted near the zipper to elude to the metal clasps in the original, and added the killinger logo. because i really can't use a stencil to save my life i cut the logo out of some pleather i painted to match the rest of the bag (and all the accessories)


here you can see the 'clasp' better


and i leave you with a glimpse of what we will see next time.... it's almost done!!!!!


thanks so much for looking!
happy haunting,
-sarah