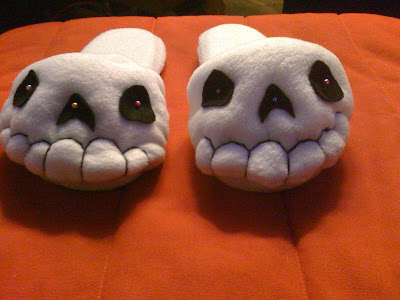
i mean really, who doesn't want a pair of skully slippers?
so, to start. i decided to make these completely from scratch... 'cause that's just how i roll ;)
i started by cutting out a shape in the outline of my foot in foam

you'll see that i have two different kinds here. the white is two layers of 1/4 inch craft foam (foamies) and the green is 1/2 inch high density foam.

next i cut two layers of polar fleece a bit larger than the outline for each shoe

then i cut more polar fleece, even larger than the first pieces, for the tops. again, two pieces per slipper. a note here, when making these in the future i will cut longer pieces for the tops so that they cover more of the top of the foot when completed.... these turned out a little short and a little harder to walk in than clogs.

next, i sewed up the bottoms, leaving a generous opening at the toe to slip the foam into

then i sewed the top pieces together (the one flat, straight seam- and please use a stretchy stitch here like a zig zag. you'll need it when you turn it), folded them around and pinned the tops to the bottoms:

another note here: if you do this using two kinds of foam make sure that what will eventually be your sole is actually on top, inside the shoe instead of on the bottom as the toes will get turned.
before i was done pinning i stuffed the tops with polyfil

now sew these up along your pinning line (i had to hand baste, then machine sewed it because my pins were getting in the way... it gets a little tight in there) and turn the toes. here you will be thankful you used a stretchy material as well as a stretchy stitch on the straight seam.

and now the really fun part begins: the needle sculpting! i can't really explain how i do this, it's just something i've taught myself over the years.... but you'll see why i used polar fleece here instead of something more traditional like terrycloth. i needed the stretch.
the completed needle sculpting:

then i cut shapes out of felt for the eyes and nose and used black embroidery floss to outline the teeth. in these next photos the eyes and nose aren't glued down yet (the dots are pins) but this is almost exactly what the final product looks like.


i've since glued down the eyes and glued red faux leather nonslip soles on the bottoms s they are now completed!
what will my next entry be about? the jacket? the mask? the magic murder bag?
stay tuned to find out!
happy hauntings,
-sarah
GENIUS! I love them so much! I can't wait to see your next piece in this costume. :D
ReplyDeleteThey look great, and can even be used apart from the costume :)
ReplyDeletethanks Svehex! and yes indeed i plan on sporting these puppies year round ;)
ReplyDeletethe walking dead our world hack
ReplyDelete